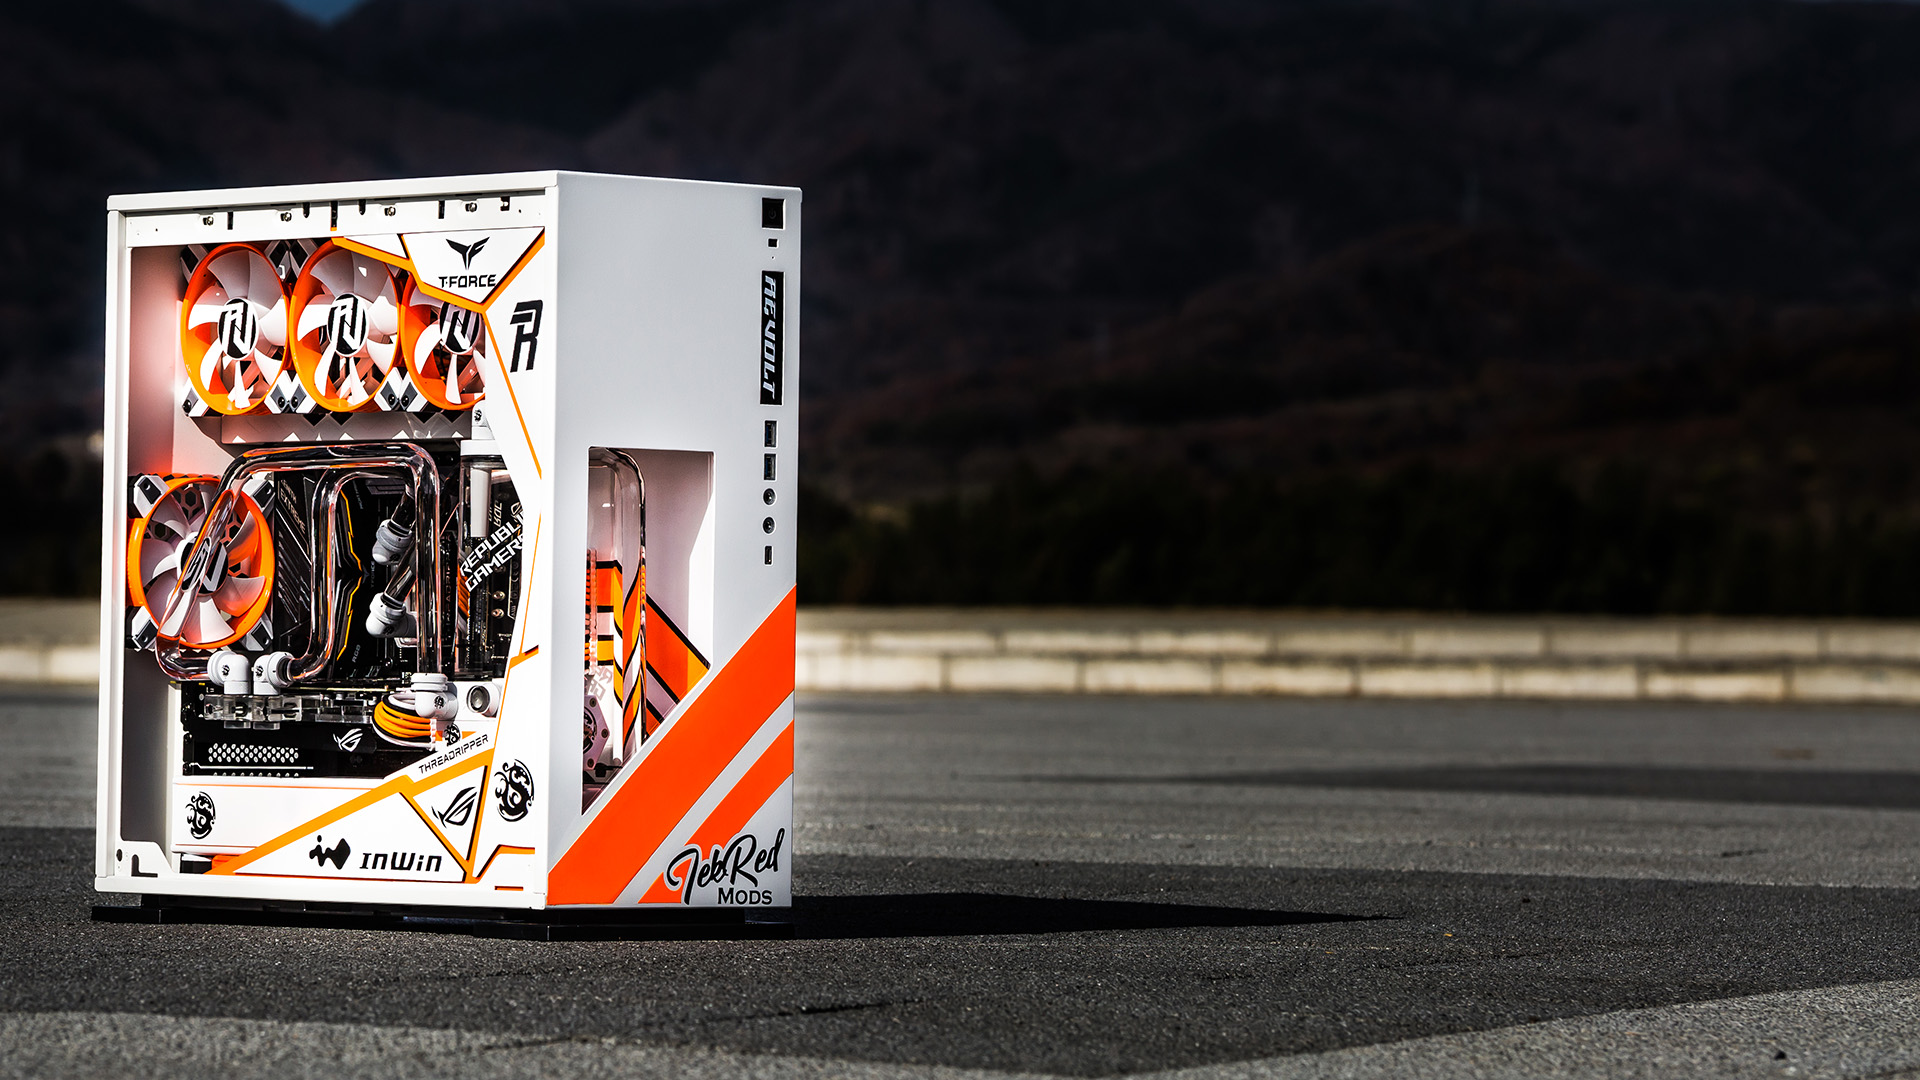
This bright and beautiful water-cooled Threadripper gaming PC is far from subtle, going straight for your eyes with its high-contrast, Day-Glo color scheme. Taking inspiration from the Asiimov weapon skins in Counter-Strike 2, PC modder Devin Waddell (aka TekRedMods) built this stunning orange and white PC with an electricity theme, which he appropriately calls ReVolt.
Thanks to our rapidly growing PC building Facebook page, we’ve seen many custom gaming PCs, from mods based on existing case designs to scratch PC builds. You can even submit yours for consideration right here. Here Devin guides us through the creation of this striking orange and white PC build.
Devin: ReVolt started life as a rebuild of a past project called Inkling. Inkling was themed on the video game series, Splatoon, so it was painted with a pink and green splatter-paint job. Unfortunately, a few months into using Inkling, my monitor shut off in the middle of a game; I looked down and noticed coolant on my Asus ROG Strix GeForce GTX 1080 graphics card. I immediately switched off the PC and removed the graphics card to clean it, but it was too late, the card was dead.
The culprit was the 12mm PETG tubing that I originally used for the water-cooling loop. It was thin-walled and had buckled around the fittings, causing it to lose its seal. I contacted Bitspower about this issue, and the company sent replacement parts, but this time around I opted for acrylic tubing, as it can be better at handling the heat required for bending. I also went with 16mm tubing to help ensure a sturdy build.
Initially, I was going to just rebuild Inkling, as I really liked the color scheme, but as weeks turned into months, I was getting frustrated with the build. The original case was damaged, and many other small issues kept cropping up, so I decided to tear it apart completely and start over.
Revolting
I decided to call this new project ReVolt, not because I was feeling particularly rebellious at the time but because I was giving new life to an old PC, and PCs use electricity. Volts, ReVolt. I’m sure you see where I was going with it. Since I was doing a completely new build, I needed a new case and a new color scheme, so I opted for the InWin 303C case, as it’s a sleek chassis with simple rectangular lines that make for an ideal starting point for modding.
As for the color scheme, one of my favorite games is Counter-Strike: Global Offensive (now Counter-Strike 2), and I really love the Asiimov weapon skins in that game. However, I had already seen an Asiimov-themed build, so didn’t want to copy the look directly. As such, I decided to keep the main white, orange, and black color scheme, but I only used the black for highlights and didn’t add any of the weathering and battle-scarring effects seen on the guns.
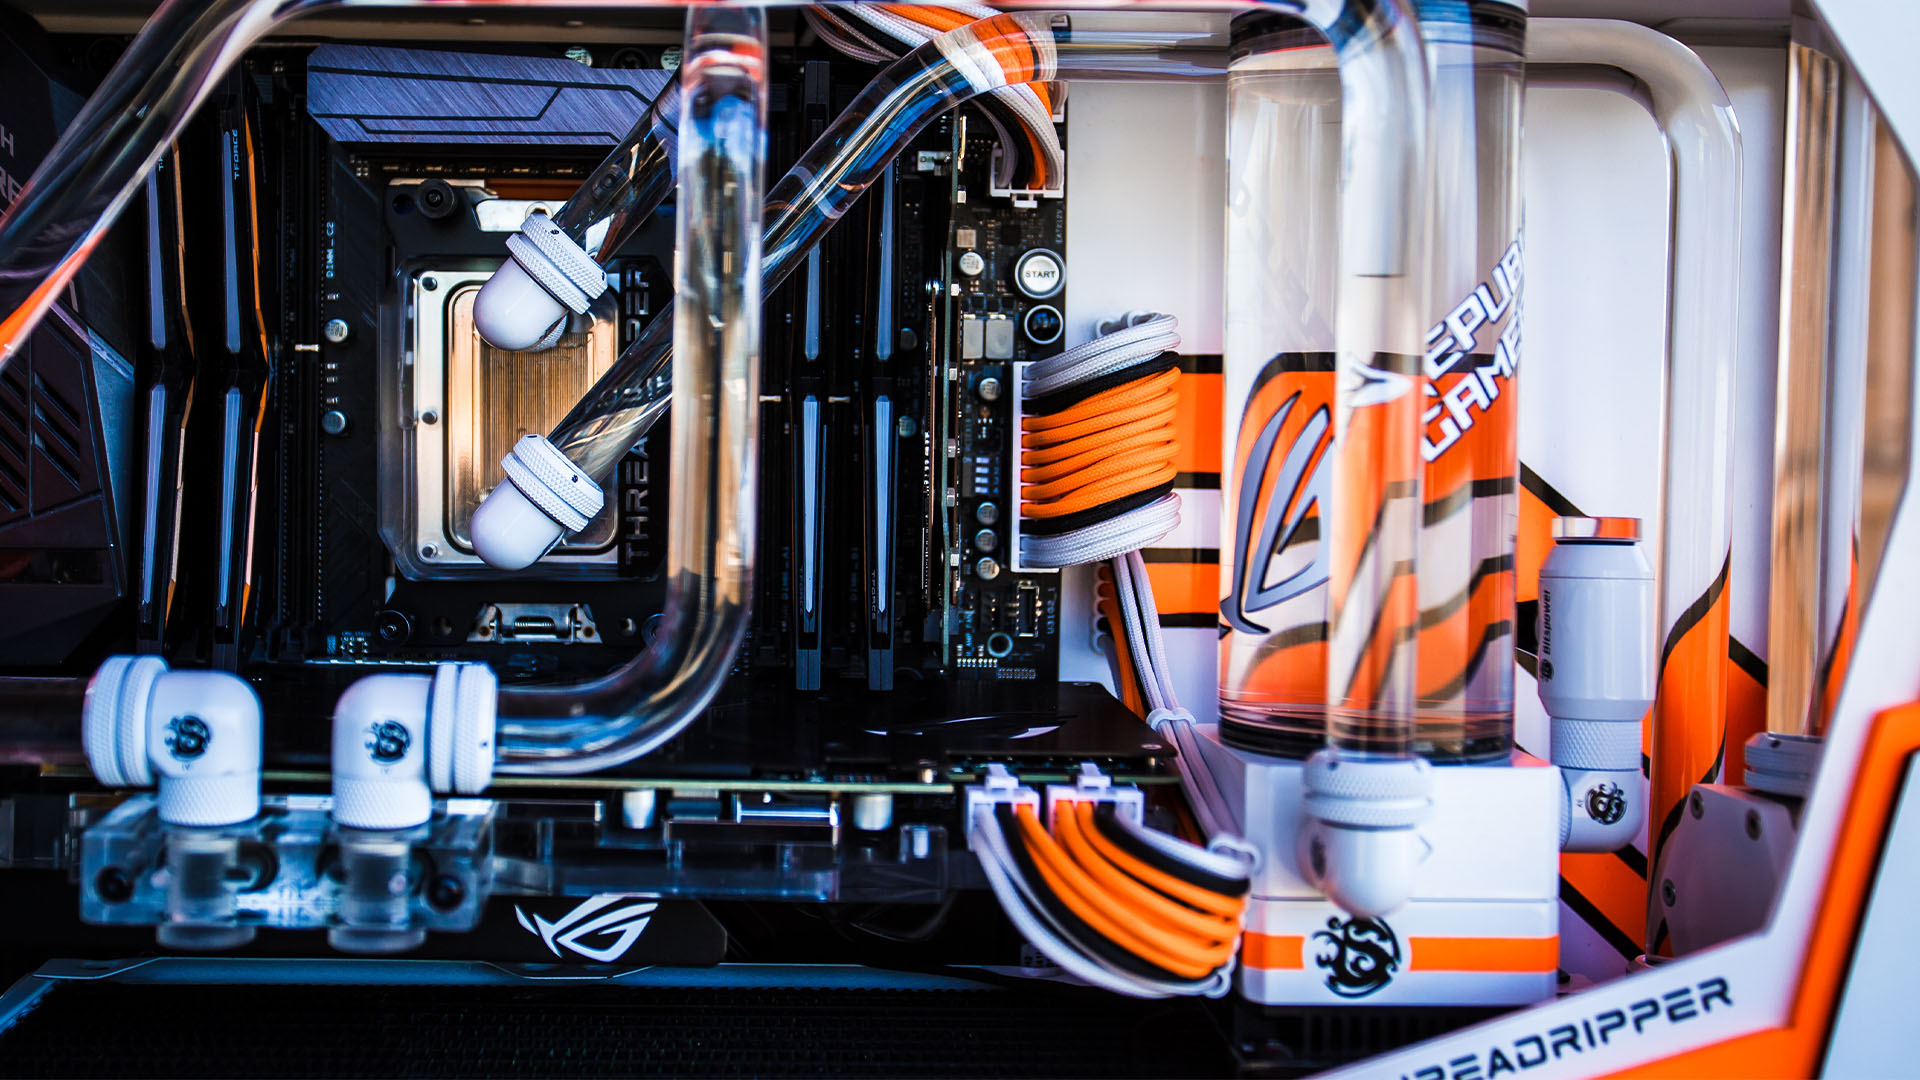
Although I was planning on doing some light gaming on this PC, its primary purpose was for graphic design work, as that’s my major in school. As such, I opted for an AMD Ryzen Threadripper CPU for its extreme multi-threaded performance, combined with an Asus ROG Zenith Extreme motherboard.
Jump start
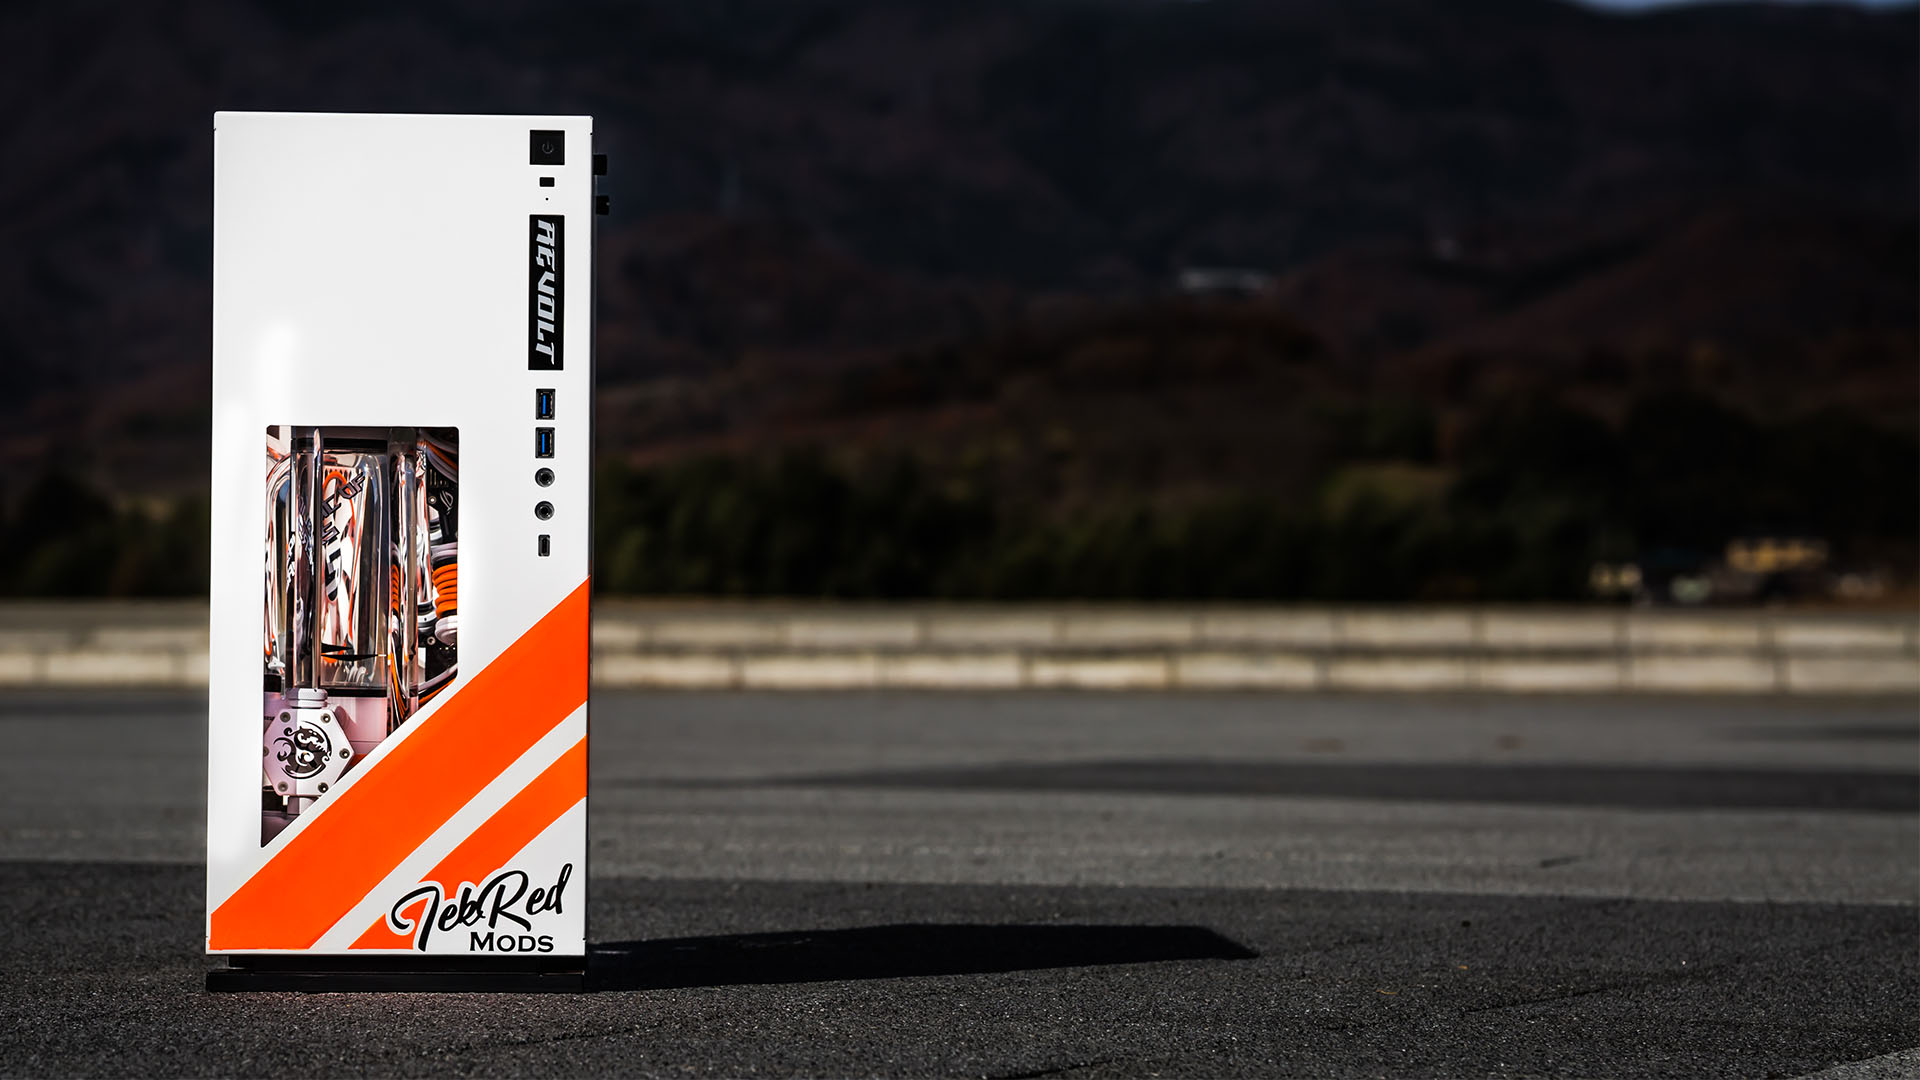
I started this project by cutting out the front window of the case. I masked off the area, both outside and inside, then carefully measured and drew my desired window design. Using an angle grinder, I then cut along just inside these lines, leaving enough material to ensure that, if I cut too much, I could still fix it during sanding.
Once the window was cut out, I used the angle grinder with a sanding disk to clean the edges. After that I used a file to further finesse each side, making sure they were perfectly straight. Finally, I wet-sanded all the edges with 320-grit sandpaper to get them completely smooth. A quick coat of matt white paint and the window was done.
One of the most difficult parts of the build was customizing the InWin Polaris fans. I decided to try something I hadn’t seen before, which was to vertically mount four fans in the top of the case. To do this without making any major modifications to the case, I made a couple of brackets from small C channel, which I drilled and tapped with holes for the fans, and to mount the assembly to the back of the chassis.
The next task was painting the fans, and I wanted the rings of the fan mounts to be orange, while the rest of the fans were black and white. This job required taking the fans apart, which was trickier than usual because there were so many parts.
Unlike most fans that only have the blade and body, these fans had the frame, outer ring, and blades. To remove the blades, there was a retention ring that needed to be taken off first, then I needed to separate the ring from the frame, which was held on by four screws. It was a fiddly job, as was masking off all the parts for painting.
Once the fans were done, I then decided the back wall next to the motherboard needed to be cleaned up, and an acrylic cover seemed like the natural choice. I cut the acrylic using my scoring tool, which I use on almost every project on which I work.
If used correctly, it gives you perfectly straight cuts that only need a little sanding afterward. I then used my heat gun to heat the sheet of acrylic and carefully bend it to shape. There were two bends quite close together, so it was rather difficult without a proper acrylic bending tool, but I got there in the end.
An acrylic cover also seemed like the best option for tidying up the open side of the case, next to the reservoir. I wasn’t sure what shape to use, so I just got out some scrap acrylic, put it in the case, and started playing around until I came up with a design with which I was happy. However, while I liked the shape, it still didn’t quite have that certain something, so I decided to cut out smaller pieces to go on top and add more texture and interest. I cut out all the pieces by hand with a drill and scoring knife, as I didn’t have a scroll saw.
Next came painting and, keeping with the orange and white styling, I decided to color the base orange and the top pieces white, giving the effect of an orange outline. However, looking in from the front, I didn’t like how the orange panel looked, so I cut out another piece of acrylic to sit behind it, providing a sharper white edge to the whole section. All these white panels not only created the overall look I was after, but also provided a convenient place to put my sponsor logos, which I made using my vinyl cutter.
The cables used in this build I made myself. I have sleeved non-modular PSU cables before, but this was my first time making a custom set for a modular PSU – the PSU I used is an EVGA SuperNOVA 850 G+. I found it rather difficult and time-consuming, as I first had to create a pin-out of all the cables. I then needed to figure out the lengths for each cable.
After completing the cables, I had to cut out a passthrough for them in the acrylic cover I made for the back wall. After fitting them, I decided to paint the acrylic as if the cables were part of the panel, with orange and black stripes continuing on from the cables.
Lastly, I decided to repaint the DDC pump and radiator that was used previously in my Inkling project. Since there was a pattern of lines throughout the build, I tried to recreate that pattern in the pump and radiator as well.
Lighting strikes
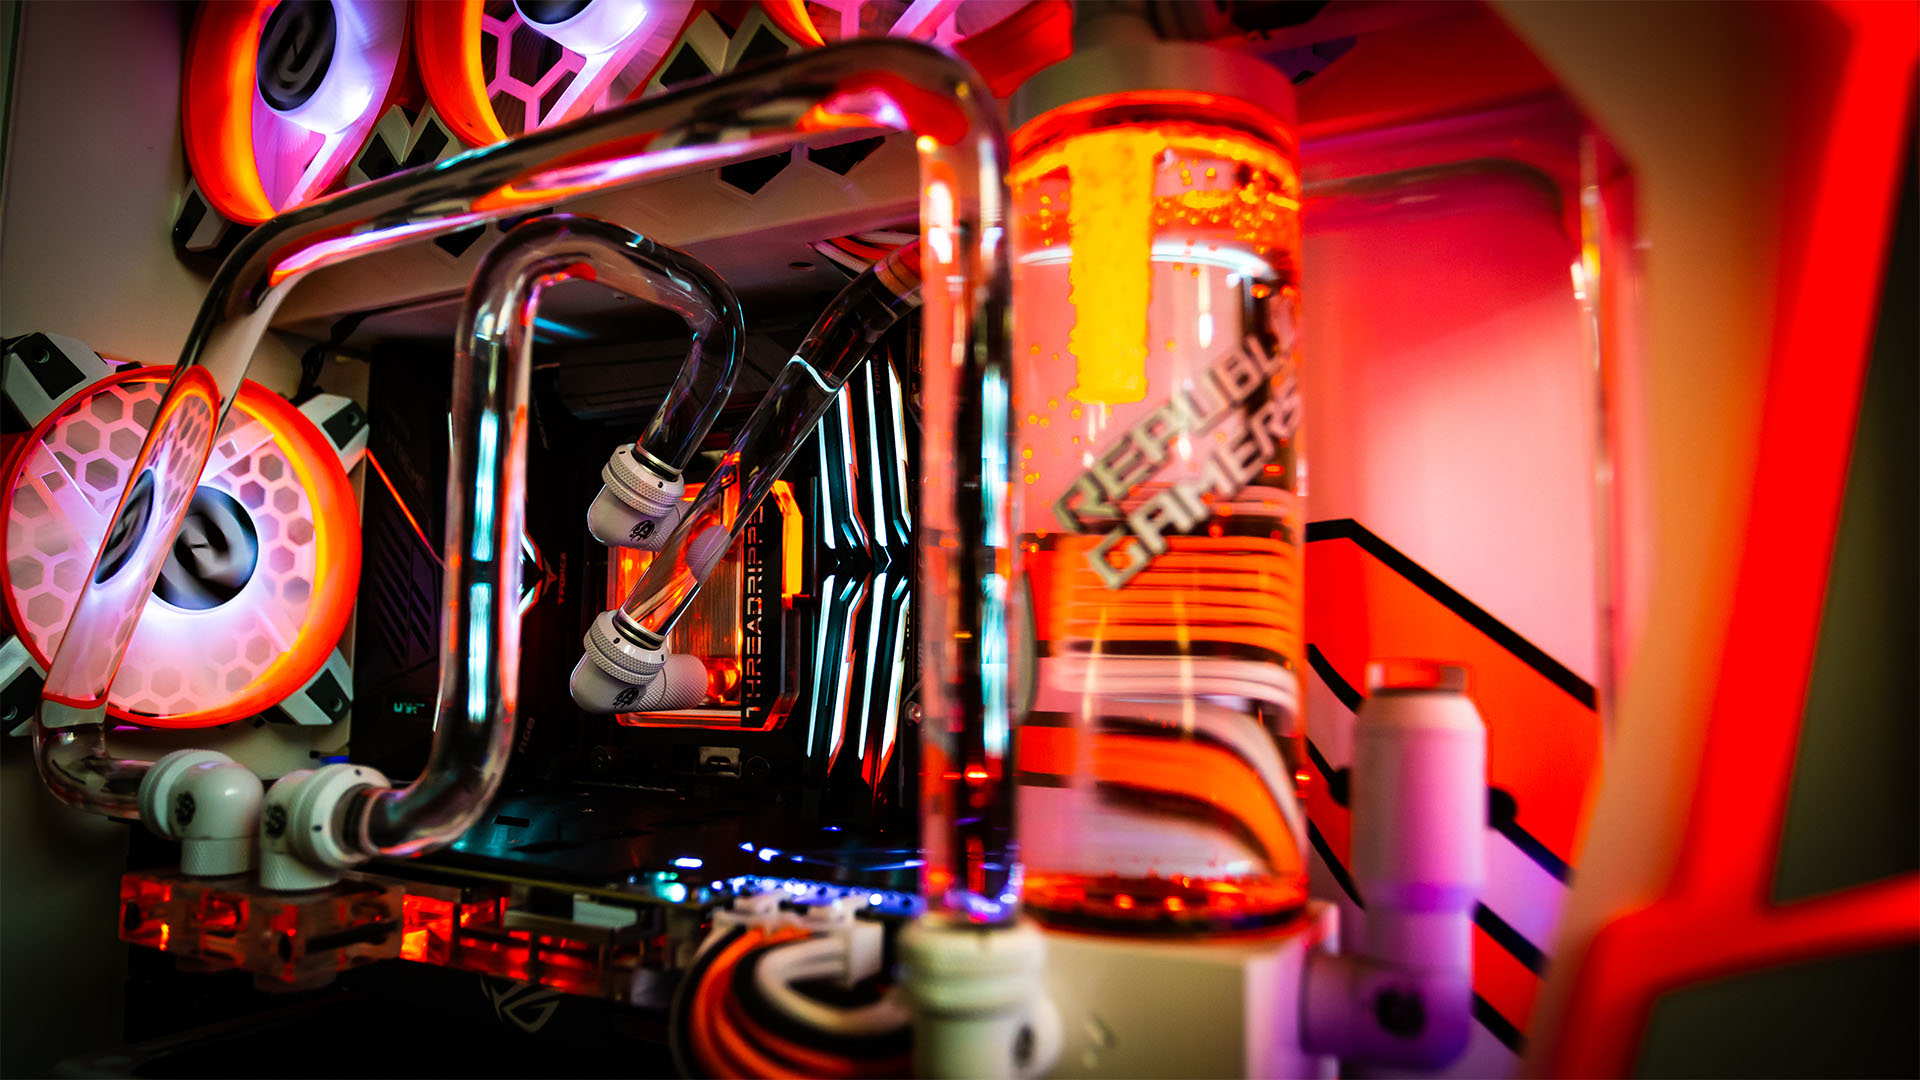
After all this gear was painted and assembled, next came the fun part: tube bending. I think I got through around 10m of tubing trying to find the right layout and look, and it took me around four days to complete. However, I got there in the end and was very pleased with the results, until I filled it up.
It wasn’t a disastrous leak that was the problem this time, but the choice of coolant color. I’d used Bitspower orange dye with Mayhems white concentrate and the resultant orange juice effect wasn’t to my liking. So, I scratched that idea, and drained and flushed the system. By this point, I’d also decided I still didn’t like the tubing runs, so out they came again, and it was back to the drawing board.
After much staring and contemplating – heat gun in hand – it finally came to me: why not reflect the same angles used in the rest of the build’s design in the tubing? It took a considerable amount of extra effort to achieve all the precise angles, with the sharp 45-degree turn above the graphics card being particularly tricky, but I’m really happy with the results. Once the tubing runs were finished, I filled up the system to leak-test it and just loved the way it looked with crystal-clear coolant. So, instead of risking another orange juice disaster, I left the coolant clear.
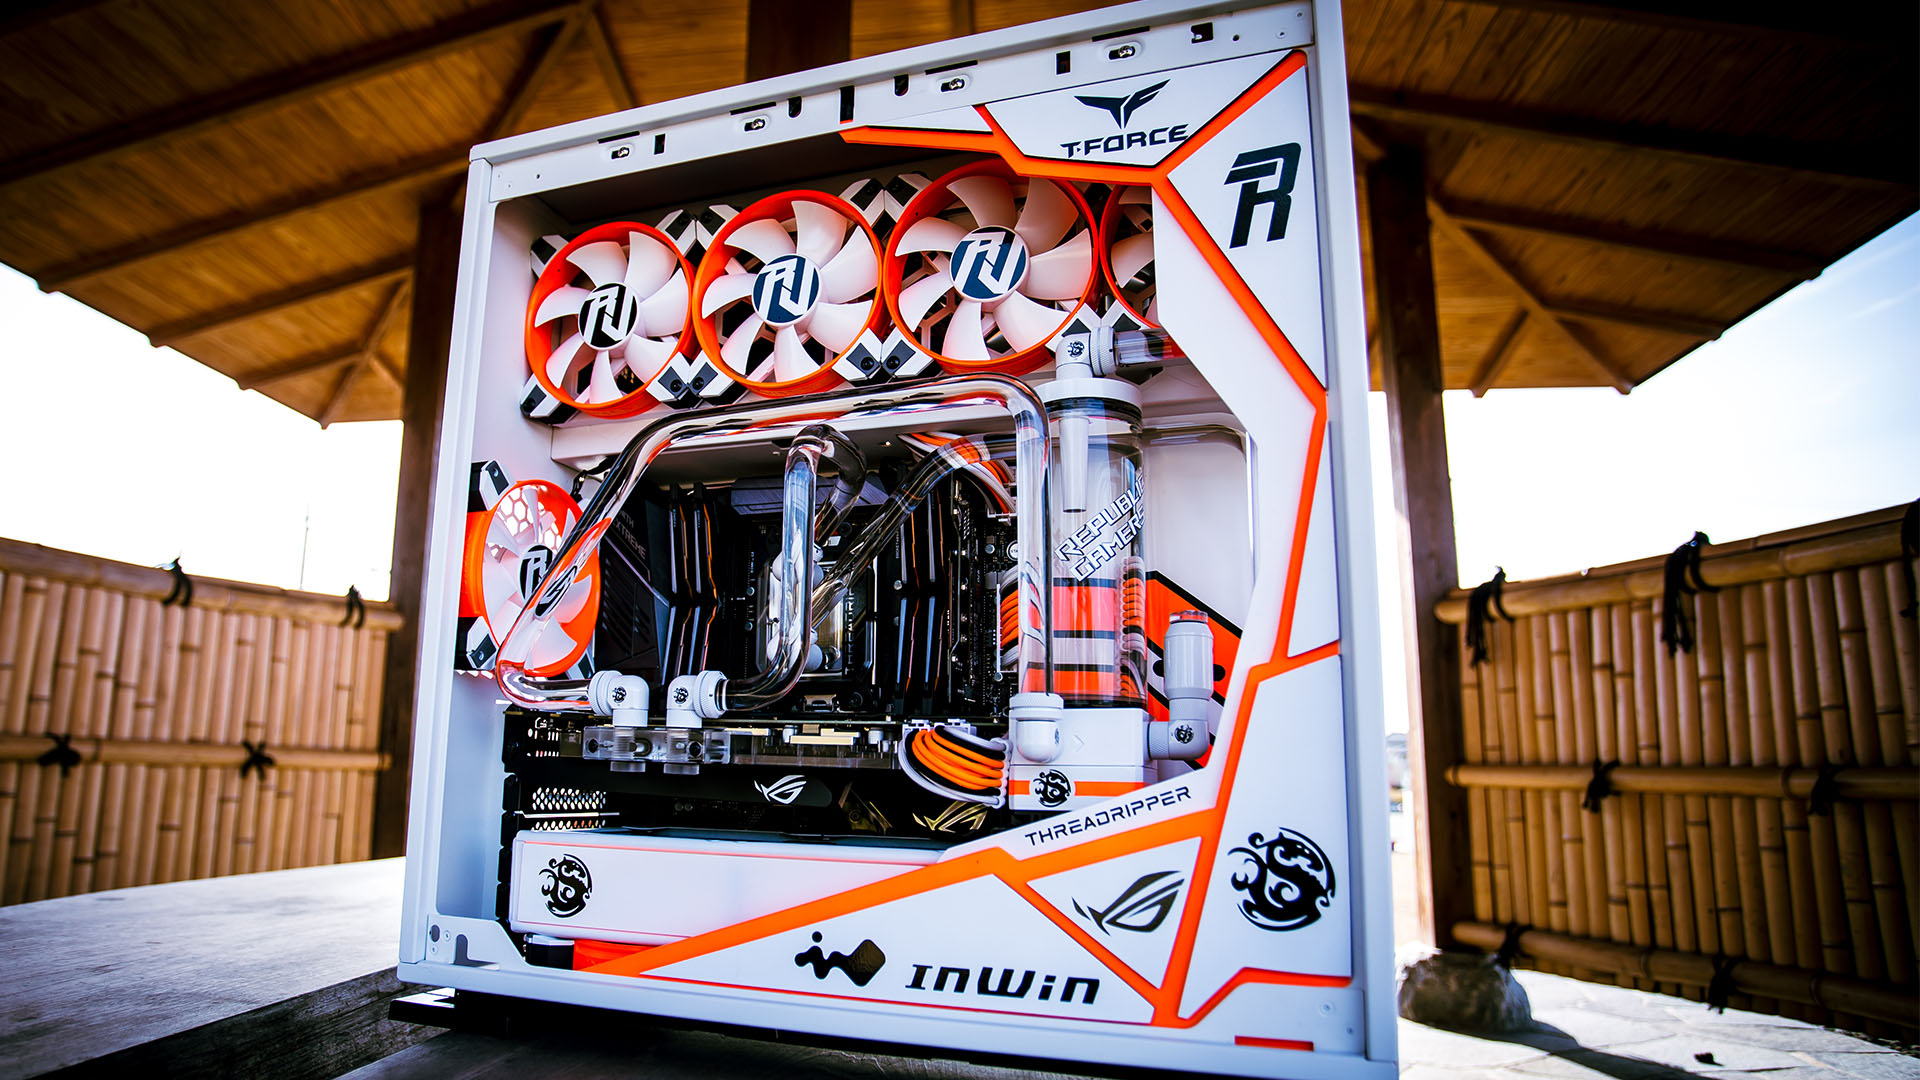
After the build was finished, my wife said the plain white case looked a bit boring and needed more of a paint job and, as always, she was right. The final flourish, then, was to add the orange lines and a logo I designed for the system to the outside of the case. Adding the sponsor logos on the bottom also helped to fill out the large expanse of white.
I‘m very happy with the way this project turned out. I love the angles and the color scheme, and ReVolt is still my personal rig to this day. I’d like to have had it all professionally painted, but I simply didn’t have the funds for it at the time. It also would have been nice to have the tools to cut and bend acrylic more easily.
I had a lot of decent tools in the USA but, after moving to Japan, I‘m having to start my tool collection over again from scratch. A scroll saw is my latest purchase, and I’m looking forward to using it on many future projects.
ReVolt Threadripper gaming PC specs
- CPU: AMD Ryzen Threadripper 1950X
- Memory: 32GB TeamGroup T-Force Nighthawk 3000MHz
- Graphics card: Asus ROG Strix GeForce GTX 1080
- Motherboard: Asus ROG Zenith Extreme
- Case: InWin 303C
- Power supply: EVGA SuperNOVA 850 G+
We love the high contrast of bright orange against white in this build, and the hand-sleeved cables look fantastic, as does the hardline water-cooling system. You can check out more of Devin’s great PC modding work on Instagram and builds.gg. If you’re new to the world of water-cooling and want to have go yourself, then make sure you also read our full guide on how to water-cool your PC.
This post originally appeared on Custom PC, which has been covering amazing setups for over 20 years and is now part of PCGamesN. Join our nearly 500k member Facebook group to discuss this build.
If you consider yourself to be an expert PC builder, you can submit your own custom PC build to us today for a chance of being featured on PCGamesN in the future.
